Where Can I Get My Tail Light Fixed Near Me
Introduction
First off, a shameless plug to my website deticated to Source Engine Level design. You lot tin can find downloads, tutorials, and more content here: TopHATTwaffle'south Website[www.tophattwaffle.com]
Lighting is a very of import part of levels. It can change the mood, feeling, and immersion level for the player. Without calorie-free, a level is never truly complete. VALVe's lighting has been increasing over the years, but withal mostly remains lightmapped, with some dynamic shadow mapping added in newer games.
In this guide you'll learn from the nuts, to more advanced parts of lighting. So kicking back and enjoy the read.
VRAD
VRAD is the command-line tool that takes a compiled BSP map and embeds lighting data into it. VRAD's static and pre-compiled light is bounced around the world with a radiosity algorithm.
VRAD will:
- Generate lightmaps
- Generate ambient samples
- Generate per-object or per-vertex prop_static and item prop lighting
VRAD is the by and large the slowest (assuming that y'all've optimized VIS correctly in the level.) of the iii compilers due to the many, many calculations it must perform. Lighting optimization can help, as tin can ensuring your map is free of leaks
Bones Lighting Tips
Tip 2 The colors of the lights are of import to the feel, and mood of a surface area. This is quite some reading y'all can do on this. Here are the links.
Color Temperature
Lighting Psychology
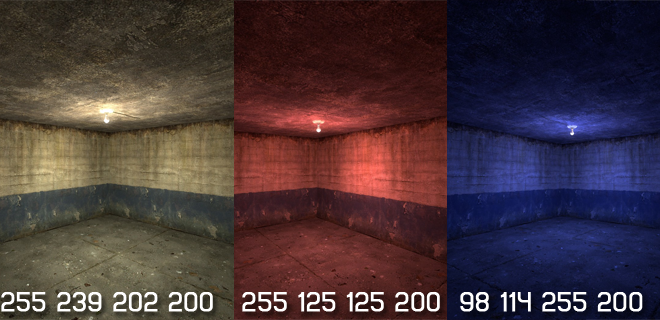
A light is almost NEVER solid white, this is why I get a bit angry when I see a 255 255 255 200 low-cal. (All light in source engine is colored in Red Green Bluish Intensity)
The lighting psychology is a proficient thing to read, it will allow you get inside of the player'south caput to keep them feeling what y'all want.
Most lights in game will exist from a red, to a blueish. Whilst most lights lights in the real world produce a warm yellow glow. You volition come across me more often than not apply a yellowish glow in my maps. The calorie-free settings for the commencement movie is: 255 239 202 150
- Yellow/Green – When a player stumbles upon a room lit past yellow lighting, it automatically makes them experience either accomplished, content, or comfortable, depending on the situation. Likewise a very stealthy color. Makes the player more aware, and more than conscientious. Information technology also gives the environment a living, breathing quality.
- Blue/Purple – The color of sadness. Blue rooms seem very full of memory. It'due south the opposite of yellow, and so it's a proficient fashion to make players slow down and recall. It tin besides cause players to second guess, so be conscientious.
- Red/Orangish – Using red volition make players feel like they need to do things quickly. Almost like the place is "gonna accident." Putting enemies in the way of the escape only helps exaggerate the suspense of the state of affairs.
- White/Brightness – White doesn't actually make the thespian recollect much. Unremarkably but makes the player focus on the job that needs to exist done and non much else. If yous want to make a adept map, employ white when NPCs are talking or telling a story. Players will focus more on the talking than the unimpressive background.
- Blackness/Darkness – Gives a big sense of dubiousness and insecurity. Good for scary maps. If you use this, don't use information technology too much because, like white, information technology'southward not meant for fun. When a actor has just finished a completely dark portion of the map, make certain that when they ascend, they see something really vivid and cool for a sense of accomplishment and dissimilarity.
Tip iv
NEVER name a calorie-free unless you lot need to. Giving a lite entity a targetname makes VRAD compile a second lightmap "page" for the surfaces that its emitted light touches. This won't impairment in-game functioning, just information technology volition increase compile fourth dimension and BSP filesize, regardless of whether the calorie-free ever receives input to change its state.
Withal, the arrangement can exist overloaded if you try to make information technology handle a large number of overlapping named lights (since the number of pages needed increases exponentially). When this happens operation can be harmed and you may well see lighting anomalies.
VRAD attempts to avoid this with its hard-coded limits of two switchable lights affecting a castor face and 32 pages in total. You can assist as well by giving lights that will always change state at the same time a shared targetname, which makes VRAD merge their pages together.
The "Light" Entity

While light travels from its source, it unremarkably diminishes in intensity, limiting the expanse that its source can illuminate. This diminishing is called "light attenuation" or "fall-off.
The "Light_Spot" Entity


When the light_spot is first placed you will run across a cone displayed from it, this shows the path that the light will take. This is rather unproblematic to ready. Information technology tin also be used to create a florescent calorie-free. This is a more favorable option over the low-cal entity.
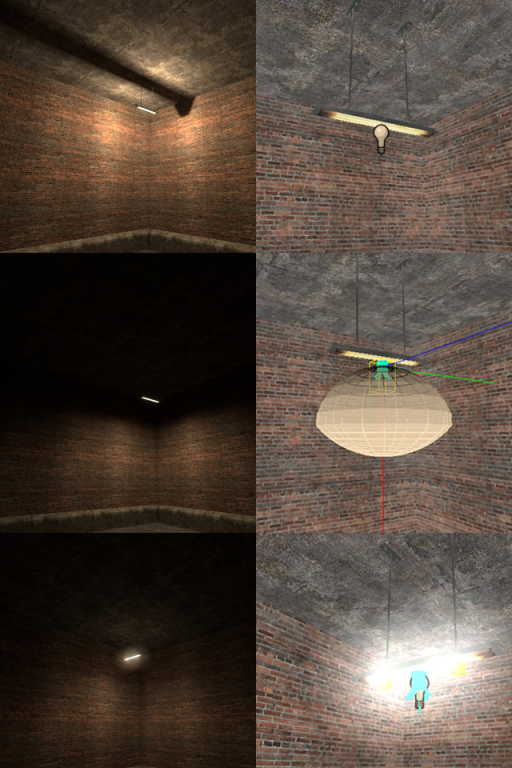
There is a inner, and outer angle. This allows you to alter how the light_spot displays light. In the screenshot you lot see a cone, this has been changed to requite apply the florescent lite feel. These are the settings used for light_spots in the picture to the right.
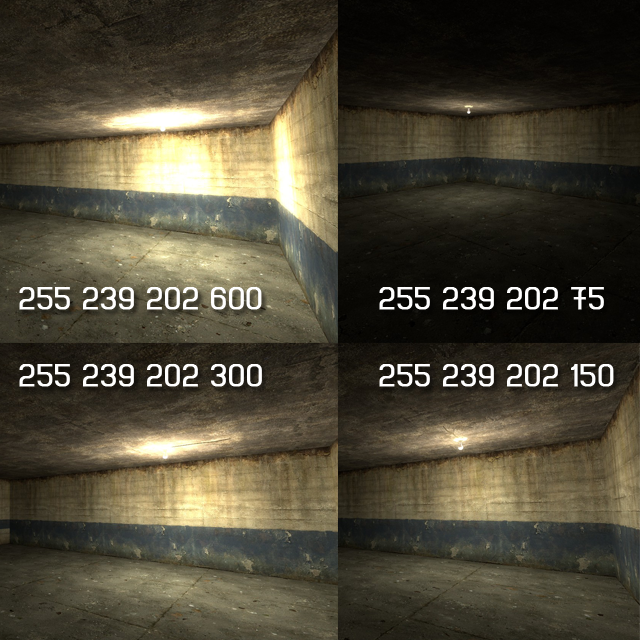
- 1. Just a lite entity, With the brightness of: 255 227 187 600
- 2. light_spot, with the brightness of: 255 227 187 600 inner angle:50 outer angle:90
- 3. Light_spot, with brightness of: 255 227 187 300 inner angle:50 outer angle:90. AND a light with the brightness of: 255 227 187 15, and a ratio of 0:one:0 (you volition learn well-nigh this ratio beneath)
Advanced Lighting Settings
There are many things that can be done to further make the lighting in your map expect real. This is washed with the Constant-Linear-Quadratic Falloff. These are how the light is projected. The lights are stock prepare to 100% Quadratic. (Constant:0 Linear:0 Quadratic:ane (0:0:ane)) Keep in mind that this is ALOT of information to take in, that is one reason this is not a video. you can re-read things easier then re-watching.
The information below if straight from the VDC

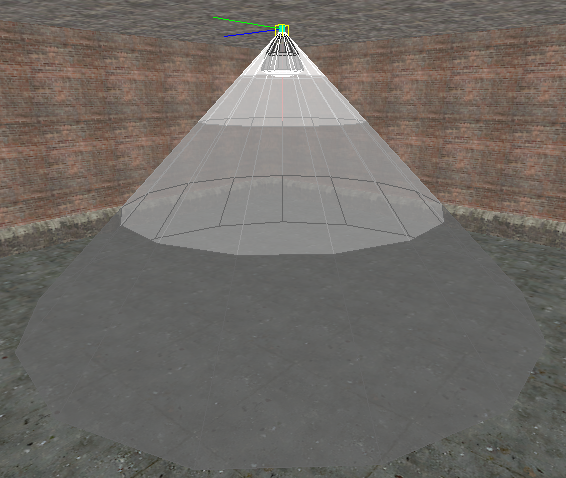
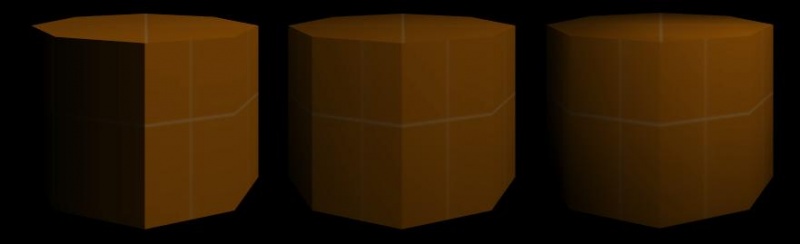
Constant Attenuation - The picture on the right shows a lightsource displaying the simplest of attenuations: Constant attenuation. The keyvalues Abiding, Linear and Quadratic have here been ready to "1″, "0″ and "0″ respectively, creating a Constant-Linear-Quadratic ratio of 1:0:0, meaning that the attenuation is 100% Abiding, 0% Linear, and 0% Quadratic.
The 100% abiding attenuation will upshot in a lite that has no attenuation at all. The intensity, represented by the brigtness setting of the light entity, will be totally unaffected past altitude, continuing until it hits a surface, theoretically capable of illuminating an infinite surface area. This blazon of light can be seen from the sky (sunlight, monlight and starlight), and other large and distant low-cal sources. It tin also be used for setting local ambient lighting (past letting it illuminate the shadows of the room) or mood lighting.
As a 100% constant lightsource is an extreme blazon of light, constant light is mostly used in combination with the other ii types of attenuations, to "soften" or limit them.

Linear Attenuation - This is the same lite entity, but at a 0:i:0 ratio, making its lighting 100% linear instead.
Mathematically, the pass up of this blazon of light is linear, inversely proportial to the altitude from the light source (I = one/d where I is intensity and d is distance). This means that the light intensity (gear up by its effulgence) volition diminish (at a fixed rate) equally information technology travels from its source. To compensate for this decline, Valve has boosted the intensity of the lightsource to 100 times its brightness.
In the real world a 100% linear lightsource would be practically impossible, every bit it would represent a real world soft low-cal of infinite size, but in the virtual world, a 0:1:0 lightsource is believable for most entity based lightsources.

Quadratic Attenuation - This is a normal, unmodified calorie-free source, preset to 0:0:ane, making it 100% Quadratic.
Mathematically, the attenuation of a 100% quadratic calorie-free is exponential (quadratic), expressed as "I = 1/d^2″, meaning that the farther the light travels from its source, the more than it volition be diminished. This creates a very precipitous drib in low-cal. To compensate for the fast reject of quadratic lights, Valve has boosted the intensity of them to be 100^2 (10 000) times more than intense than the bodily intensity.
An unmodified (100% quadratic) lightsource represents a pure "point light source" in the real world. In the virtual world, this issue looks like a lightsource shining through murky h2o, looking far from typical real world lightsource behavior.
When used in moderation, quadratic attenuation can be used not only for minor lightsources, simply also to reverberate light travelling through something more than dispersing than air, like air humidity (like fog) or water.
Mixing Attenuation - When blending between these three types of attenuation, you prepare the proportions of each attenuation type against the other 2 types. To avert defoliation, keep in mind that y'all tin can gear up the scale of these proportions as y'all wish: A proportion of 3:6:1 gives the exact same event as 6:12:ii, or 30:sixty:10, which can hands be translated to 30%, 60% and 10%.
Although the Constant-Linear-Quadratic Falloff is a very expert mode to fine tune the projection of the lighting in your level, this can be very disruptive. You can still tune the lighting using the falloff altitude.
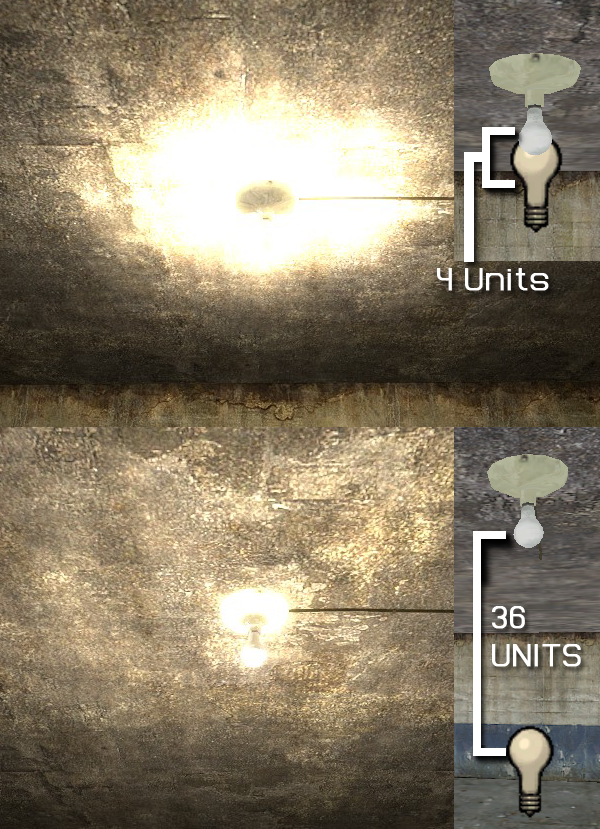
50/0 percentage falloff altitude
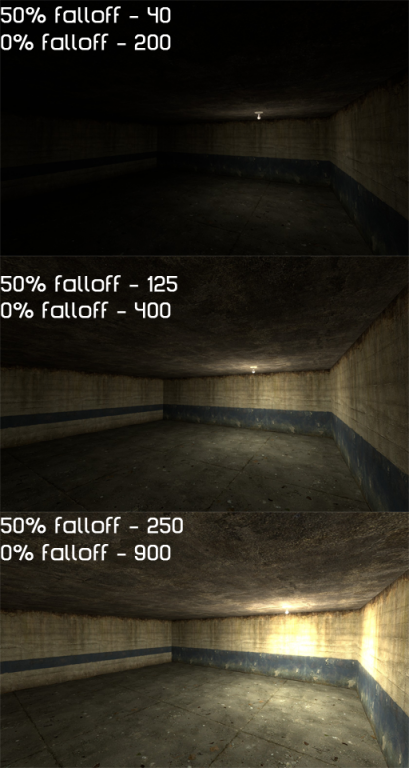
fifty per centum falloff distance: What always y'all prepare this to the light will dissipate down to 50% past this distance. Same for the 0%.
As yous can see from the screenshots to a higher place and below, the falloff gives you nigh the same effect you would become with the Abiding-Linear-Quadratic Falloff. All of the lights in the picture show hither use these settings: 255 239 202 200
The dynamic lights and shadows
And then env_projected texture is a special entity that can project light, and dynamic shadows of the receivers.
You're only allowed to have one of these on at a time. Whatever game fabricated afterwards Portal 2 will have nicer shadows emitted from this entity. Games before Portal ii volition have grainy shadow edges.
Games such as Counter-Strike Global Offensive tin have a dynamic lights broadcast from the skybox using the shadow_control entity along side the light_enviroment
The light_environment


Glows, and beams for lights
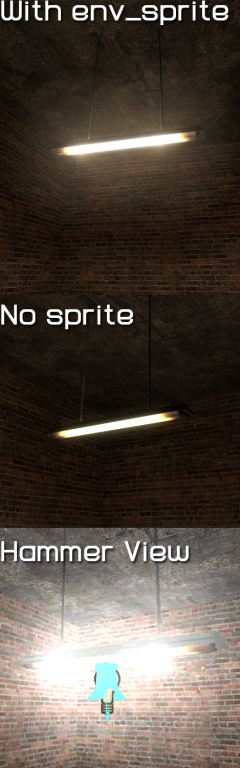
Env_Sprites are typically used for a normal light glow, they are defaulted to be circle light glows, but tin can be changed to any sprite.
Starting time to create a env_sprite, just create it. So send the return mode to "World Space Glow." This will allow the sprite to render in game (See Render Modes for details) And then set up your color and FX amount. This will tone down, or intensity the effect of the sprite. For a florescent light gear up the FX corporeality to effectually 140ish.
Point_spotlights are used to create a calorie-free axle from the source, and a blinding effect when looked at straight on. These are even easier to fix then the env_sprite. Simply create one and point it. Nether the flags of the point_spotlight there is a flag that volition enable the dynamic calorie-free for this. This upshot is very expensive to render and should not exist used alot.

Lightmaps

info_lighting

I mutual example is the HL2 static Ladder props; when used in night areas they may appear to glow, which tin be corrected by inserting an info_lighting, naming it and specifying that name in the backdrop for the Ladder prop.
Tonemap and HDR lighting
HDR lighting gives your map a whole new feel of realism with lighting. Information technology stands for Loftier Dynamic Range Lighting, basically. It makes things glow as they would in real life. When you get from a night tunnel, to a bright outside environment you lot are basically blinded. Just like if you wake up at noon and look outside. Merely the HDR is not e'er good to correct later a compile, information technology is often too vivid, or dark. To fine melody this you need a env_tonemap_controller. Just add information technology to a map, then name it "tonemap" Adjacent load the game. Burn this console command:
- ent_fire tonemap setautoexposuremax #
- ent_fire tonemap setautoexposuremin #
- ent_fire tonemap SetBloomScale # (Flower ONLY)
For the numbers on the max, I like to get-go with 6 and go from there. Then set up the min to about .75 and go from there. Then write these numbers downwards once you are happy with them. You may not notice annihilation happen when you change the flower scale, this is considering HDR is on, and not blossom. Basically just take the low average of the max and min. So if max=4 min=.5 set the bloom to nigh 1.5. Then create a logic_auto in your level and add the following outputs:
- "onmapspawn" tonemap,setautoexposuremax,#,0.00,-one
- "onmapspawn" tonemap,setautoexposuremin,#,0.00,-1
- "onmapspawn" tonemap,SetBloomScale ,#,0.00,-one
Brand sure to compile your map with HDR to meet the results.
Smoothing Groups
Used to smooth lighting betwixt faces. Found in the face edit dialog, the groups allow the lighting of a face to be smoothed between other faces, to produce rounded effects with lighting. A archetype example is when making a cylinder: If no smoothing groups are set up, each face on the castor will take hold of light separately and will exist lit separately. This volition create a very obvious effect of split up each confront. If they are all placed in the same smoothing group the light will be blurred between the faces creating a much smoother rounder look on the pillar. Tip:Smoothing groups have no affect on performance, apart from adding extra time for RAD to compile, so use them on your final compile.
Compile Settings
The Orange Box engine (Source 2007) added three additional options y'all can utilize when compiling to improve the realism during compile. To access these, open Expert manner in the Run Map dialog and select "HDR Total compile -last (slow!)"; and so, select the "$light_exe" line in the list below that. In the Parameters field, suspend the options you wish to use, as shown below.
Annotation: these considerably increase compile fourth dimension, and then information technology is recommended that you save them for the last few stages of your map!
-staticproppolys
Ordinarily, VRAD creates shadows under static props based on the collision mesh, since collision meshes are usually much simpler but still close plenty to the prop's shape. This is commonly sufficient, but some props may have oversimplified collision meshes — or none at all — causing VRAD to create unnatural shadows. This option allows you to override this for certain props and force VRAD to use the polygon mesh instead. This is likewise necessary if yous demand to use -textureshadows (see below).
Simply suspend -staticproppolys to the $light_exe Parameters list (encounter above).
-textureshadows
Not all props have their "holes" defined solely by geometry. Mesh fences, for instance, use textures with alpha channels. These are non normally recognized by VRAD, so if you use them you will accept to either disable shadows from them (which sometimes produces decent results) or add this pick, which forces VRAD to have alpha channels into account as well, only like with brushes.
To make -textureshadows piece of work, you demand to create a custom RAD file for your map listing which props you want this choice to affect. Extract the lights.rad file from the game in question using GCFScape or Crafty, place it in the game folder, and give information technology a new name. Then, open information technology in any text editor and suspend the line forcetextureshadow [full path of prop] to the file for each model y'all desire this to affect. Y'all volition also need to have 'staticproppolys enabled for this to work.
Finally, append -lights [name of your custom RAD file] -textureshadows to the $light_exe Parameters list (see above).
-staticproplighting
Unlike the other 2, this option affects the lighting received past props. Props are by and large lit based on the lighting levels at their origin (see info_lighting above), which can atomic number 82 to unnatural lighting if a light source is aimed at simply 1 side of the prop or if the prop is half in shadow and halfway in light. This option forces VRAD to calculate the lighting level at each vertex instead. Of these 3 options, this one will probably affect compile time the almost, but is commonly a necessary stride in making the map'southward props await convincing.
Just suspend -staticproplighting to the $light_exe Parameters list (meet in a higher place).
Notation: This volition crusade some props, such as pine trees, to attempt to bandage shadows on themselves, creating an unrealistic look. To fix this, nether the prop's properties, set the value for Disable Self-Shadowing with vertex lighting to "Yeah."
- Valve Developer Community
To see what these exercise, view the images/watch the end of Tutorial 74: Advanced lighting[www.tophattwaffle.com] has gone over this every bit well.
Limits
There are alot of limits that the source engine has limits on. I'll list all of the limits I know almost below (lighting limits only.)
- One environment in a given level. But the offset one volition work. Having more then ane in a level may cause errors.
- Whatsoever given brush tin can have a max of four different light styles on it. Having more will cause lighting errors.
- Lights styles are unlike types of lite colors, non brightness.
- EX of 5 different lights styles: 255 255 0 200, 0 255 255 200, 255 0 255 200, 128 128 128 200, 0 128 255 200
- EX of 6 dissimilar lights, just not different styles. 255 255 0 100, 255 255 0 300, 0 255 255 600, 0 255 255 150, 128 128 128 100, 128 128 128 1200. This volition non cause errors, because there are merely 3 dissimilar styles. The brightness does not event a fashion.
- The effulgence of a light must exist positive, if not information technology will suck the calorie-free from your map. Or cause errors.
- 32 Light map pages, when naming lights that would share a face. Name them the same.
Source: https://steamcommunity.com/sharedfiles/filedetails/?id=158909187
0 Response to "Where Can I Get My Tail Light Fixed Near Me"
Post a Comment